I found the answer in a 28-point bundle of green scaly love. Most top players don’t consider the Green Dragon to be a tier-one piece, and I agree that in general, it’s probably a bit overpriced. But in this metagame, on this map, under timed conditions, I feel it’s the best possible option.1
The Green Dragon has three things to offer that make it a great choice. First, it has amazing speed: flight 12. This allows near-guaranteed tile points on the very first round. Second, it has 70hp, making it virtually impossible to kill without dedicating a heavy hitter to the task. And third, it has a non-cold breath weapon. In a metagame filled with Warrior Skeletons and other cold-immune fodder units, I could not rely on the Chraal's breath weapon to clear out screening weenie units. But the Green Dragon's acid breath does the job nicely.
These three advantages, combined with the surprise factor of seeing a little-used unit in top-tier play, gave me a crucial advantage in my mirror matchups. In fact, I would say that the Green Dragon was a key element in almost every one of my wins.
The plan
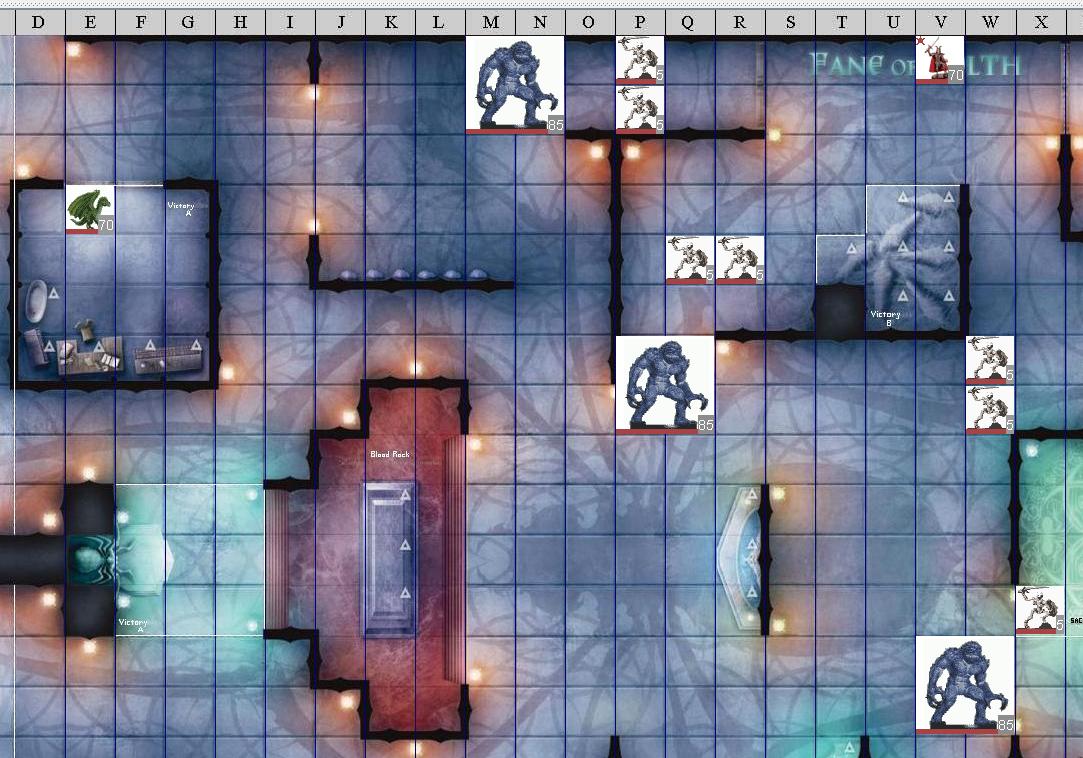
Its an old proverb that no plan survives contact with the enemy, but thats no excuse not to have one. One of the benefits of playing on a fixed map is the ability to plan beforehand roughly where youd like each of your units to end up at the end of round one. Of course, this will vary slightly depending upon what your opponent is playing, and where he moves round one. But in general, its helpful to know ahead of time what an ideal setup would look like. For my band, practice had shown that the best place to set up is in Cocoon Corner, the top start area on Side A. Setting up in this corner offers me several advantages. First, and most importantly, it offers great choke points that are only two squares wide, and can therefore be blocked by a Chraal or a pair of skeletons (see Fig.A). This enables the Blackguard to command from a safe point that cannot be reached by non-flying enemies. Second, the lines of sight from the Blackguard are very good, allowing him to keep the entire band under command. Even when the Green Dragon moves to the library victory area, he can remain under command from this corner. Third, from this corner it is easy to deny tile points on rounds one and two to most enemies, while virtually guaranteeing me tile points in both rounds. That may not sound like a big deal, but think of it this way: against most bands, the score effectively becomes 20-0 in my favor as soon as I set up my warband in Cocoon Corner. Because I had practiced so much with that corner, whenever I won initiative at the beginning of a game, Id immediately choose to set up first on Side A. With the Blackguards +6 initiative bonus, this was fairly often. If my opponent won the roll, and was unaware of the advantage Id get from using side A, he would often either pass the decision to me or choose side B himself. As a result, for every single one of my ten games, I got to start in Cocoon Corner.2
This "ideal" setup isn't always ideal, of course. In general, this setup is for games that meet two critera: they are likely to be decided on points rather than by elimination, and the band I am facing does not include a hitter that flies.
So, in a mirror match, I would almost certainly want a setup similar to this. But against a large dragon or Justice Archons, I would probably want some Skeletons back closer to the Blackguard, where they could block a flyer from landing. And against some flavors of CE hitter bands, I'd want the lowest Chraal up where the double skeletons in column W are.
I feel obligated to reiterate that a setup plan like this is only a guideline, not a strict procedure that I slavishly followed. You must always be prepared to react to your opponent and the changing conditions of the battlefield, and adjust your first-round moves on the fly.
The Matchups
Below, I've created a summary table of my matchups, as best I can remember them. If you can help me correct any of this data, or for that matter anything at all in this report, then please email me and I'll get it corrected. Thanks!
Round |
Result |
Opponent |
Alias |
Band |
Location & Notes |
| Round 1 | Win | Jason Kean |
Millygoat |
Lich Necromancer, Ogre Ravager, Red Samurai, Harpy, Troglodyte, Cursed Sprirt, Abyssal Maw, Orc Warrior x 4 | Ohio |
| Round 2 | Win | Chris Seefeld |
dj-chuckles |
Large Red Dragon, Eye of Gruumsh, Orc Champion, Tiefling Captain, Abyssal Maw, Orc Warrior x 3 | Minnesota , Gamerocket.net |
| Round 3 | Win | Kevin Kosztko |
Red Kev Dragon |
Eye of Gruumsh, Red Samurai, Orc Champion, Ogre Ravager, Tiefling Captain, Orc Warrior x 6 | Canada |
| Round 4 | Loss | Sebastien Poupart |
BadCleric |
Eye of Gruumsh, Orc Champion x 2, Ogre Ravager, Tiefling Captain, Orc Warrior x 6 | Canada |
| Round 5 | Win | Dwayne Stupack |
Tried |
Orog Warlord, Chraal x 3, Orc Berserker, Orc Savage, Goblin Skirmisher, Warrior Skeleton x 7 | California, Dear Mr. Fantazy |
| Round 6 | Win | ? |
? |
Human Blackguard, Chraal x 2, Efreet, Kobold Sorcerer, ? | ? |
| Round 7 | Win | Sven Myrin |
Smyrin |
Large Silver Dragon, Couatl, Cleric of Yondalla, Lidda, Halfling Rogue, Man at Arms x 6 |
California, Dear Mr. Fantazy |
| Quarterfinals | Win | Bill Baldwin |
Trollbill |
Orog Warlord, Chraal x 2, Efreet, Mountain Orc, Blue, Orc Warrior, Goblin Skirmisher x 2, Warrior Skeleton x 2 |
Florida |
| Semifinals | Win | Robert Hatch |
Dagni |
Orog Warlord, Chraal x 3, Orc Raider, Orc Warrior, Warrior Skeleton x 8 | California, Dear Mr. Fantazy |
| Finals | Win | Mike Brezsnyak |
brez |
Ryld Argith, Red Samurai x 2, Abyssal Maw, Orc Warrior x 7 | Massachusetts |